Why Angular2
- Expressive HTML
- Powerful Data Binding
- Modular by Design
- Built-in Back-end Integration
TypeScript
Typescript is a Superset of Javascript
Transpiles to plain Javascript
Open-source language
Strongly Type (强类型语言)
@Component {
  pageTitle: string = 'test';
  product: any[] = {...}
}
we can also custom a storngly data type for certain data type, like below:
// product.ts

export interface IProduct {
    productId: number,
    productName: string,
    productCode: string,
    releaseDate: string,
    description:string,
    price: number,
    starRating: number,
    imageUrl: string
}

// we are able to implement it with method here.
then we have a data type IProduct, which can be used in Angular2
import IProduct from './product.ts';

@Component {
  pageTitle: string = 'test';
  product: IProduct[] = {...}
}
Class-based object-orientation
Angular2 can also be compiled with Dart which is not a Javascript Language
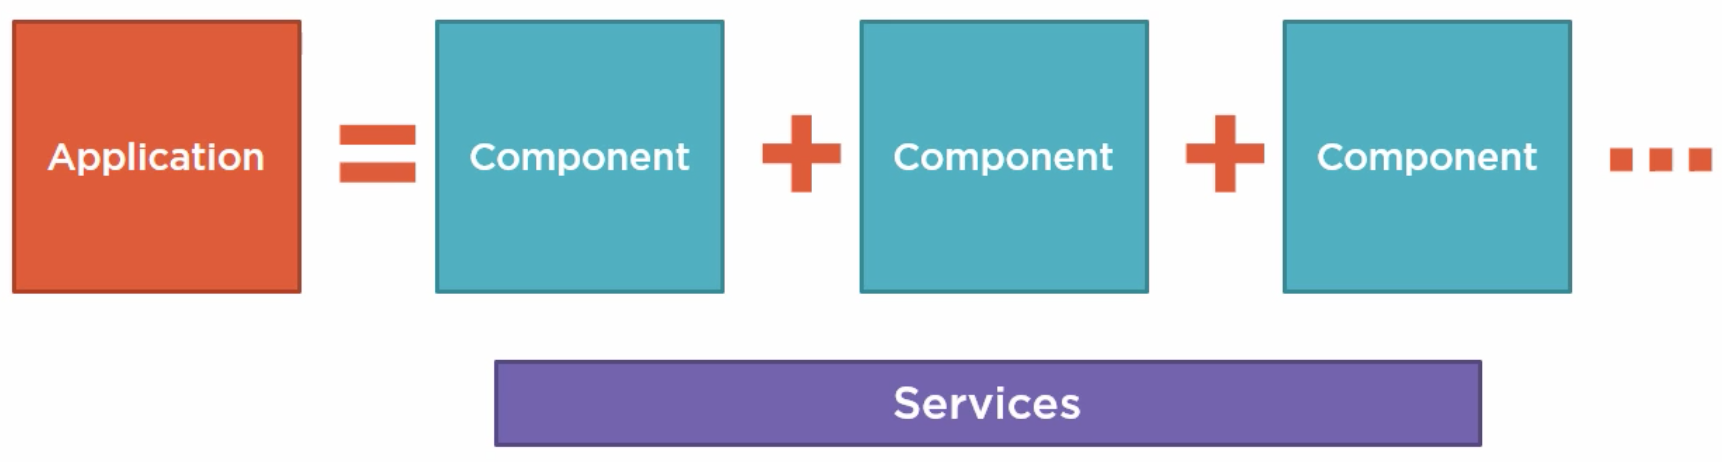
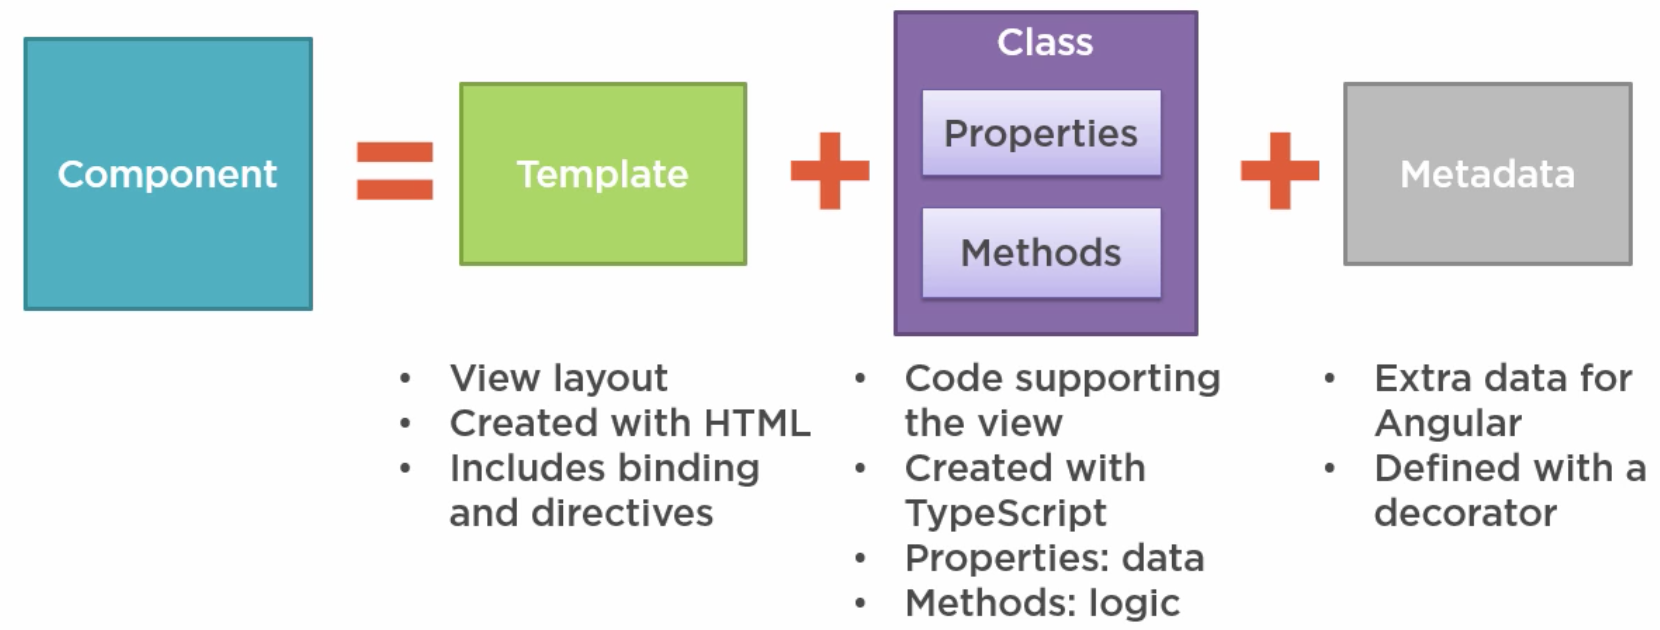
Component
import { Component } from '@angular/core';			// Import Component decrator from Angular

@Component({						// Matedata and Template
    selector: 'pm-app',
    template: `
		<div>
			<h1>{{ pageTitle }}</h1>
			<div>My first Angular2 App</div>
		</div>
    `
})
export class AppComponent {			// Class, "AppComponent" is the component name used in the code
  pageTitle: string = "Ethan's Product Management System Demo"
}
Decorator
A function that add supplied information (metadata) to a class, its members, or its method arguments.
@classname(supplied property, supplied method, supplied parameter...)
Decorator 原属于一种设计模式,在既有的类上面新增功能,从而避免大量不必要的继承子类,是子类的一种有效代替。 例如,原本selector 属性有值,但是通过decorator 的替代,我们就可以直接换掉selector原本的内容,而不需要重新把内部定义selector的代码重复一遍或者继承一个子类。
Decorator is a ES7 feature, which only be implemented and used with Typescript.
Import
import { Component } from '@angular/core'; // Import Component decrator from Angular
Before we used any external function or class, we need to import it first with ES6 modular.
example above import Component decortaor from the @angular folder
- @angular/core
- @angular/animate
- @angular/http
- @angular/router
Metadata & Template
@Component({						// Matedata and Template
    selector: 'pm-app',
    template: `
		<div>
			<h1>{{ pageTitle }}</h1>
			<div>My first Angular2 App</div>
		</div>
    `
  	// or templateUrl: 'app/products/product-list.component.html'
})
@component({...})is a component decoratorselector: 'pm-app'is directive name used in HTML<body> <pm-app>Loading App ...</pm-app> </body>when Angular is loading, the nested “Loading APP …” will show up
template: …is the template for view layoutwill be automatically bind to the class preproty “pageTitle”Inline Template:
template: "<h1>..</h1>"Linked Template:
templateUrl: 'app/products/product-list.component.html'templateUrl path should start from app since it will be load in ts transpile, which is the same folder with app.
as an alternative, we can add a moduleId attribute to use the relative path
@Component({
  selector: 'pm-products',
  moduleId: module.id,
  templateUrl:'product-list.component.html'
  styleUrls:   ['product-list.component.css']
})
Stylesheet
Inline stylesheet
<img [style.margin]='imageMargin'
     [style.width.px]='imageWidth'>
Encapsulating Component Style
@Component({
  selector: 'pm-products',
  templateUrl:'app/products/product-list.component.html'
  styles:['body {color: #337AB7}']
})

//or

@Component({
  selector: 'pm-products',
  templateUrl:'app/products/product-list.component.html'
  styleUrls:   ['app/products/product-list.component.css']
})
LifeCycle
import { Component, OnInit } from '@angular/core';			// Step 1

...

export class AppComponent implements OnInit{				// Step 2
  ...
  ngOnInit(): void {									  // Step 3
    console.log('In OnInit')
  }
}
Step 1 import hooks from angular Step 2 implement hook interface in class optional?Step 3 add hook method (ngOnInit) in the class
- OnInit:act before component initialization, good time to retrieve data
- OnChanges: perform action after change to input property
- OnDestroy: act before angular destory components
Nest Component (嵌套组建)
If there is no data transfering, then use the component as usual.
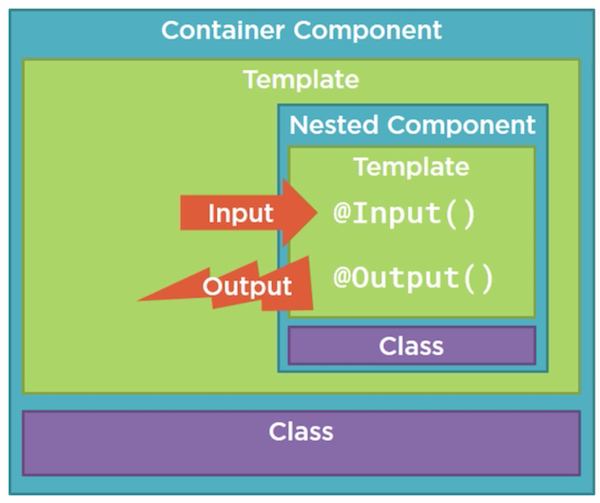
If child components need data from parent component, then we use nest component.
Parent —> pass property —> Child Component WITH @Input
import { Component, OnChanges, Input } from '@angular/core' @Component({ selector: 'ai-star', moduleId: module.id, templateUrl: 'star.component.html', styleUrls: ['star.component.css'] }) export class StarComponent implements OnChanges{ @Input() rating: number; starWidth: number; ngOnChanges() { this.starWidth = this.rating * 86 / 5; } }<td> <ai-star [rating]='product.starRating'></ai-star> </td>Input
import input module from @Angular/core, to data that need to be transferred, use
@input()decorator.OnChanges
use OnChanges hook to make sure different data has its own property.
in the case above, the starWidth is a changing data based on the inputed rating, so it should be defined in the ngOnChanges hook.
If a child component need to trigger something from parent component, then we use @Output module
Child —> Trigger Event —> Parent Component WITH @Output Decorator
STEP1 import Output and EventEmitter from ‘@Angular/core’
STEP2 in the child ts file
import { Component, OnChanges, Input, Output, EventEmitter} from '@angular/core'

@Component({...})

export class StarComponent implements OnChanges{
    ...

    // add an event: ratingClicked (pass a string message)
    @Output() ratingClicked: EventEmitter<string> = new EventEmitter<string> ();

    // add a onClick event, once div is clicked, emit event with following string
    onClick(): void {
        this.ratingClicked.emit(`The rating ${this.rating} was click`);
    }
}
in the child HTML file
<div (click)="onClick()">STEP3 in the parent html file
<--! now ratingClicked is an event that can be triggered by click the child component -->
<--! and the $event params is the passing message thay can be used in other methods-->

<ai-star (ratingClicked)="onRatingClick($event)"></ai-star>
Angular Module
// import main module from angular folder
import { NgModule } from '@angular/core';
import { BrowserModule } from '@angular/platform-browser';
import { FormsModule } from '@angular/forms'

// import components from each compoenet folder
import { AppComponent }  from './app.component';
import { ProductListComponent } from './products/product-list.component'

// a decorator of AngularModual
@NgModule({
  imports: [ 			// main module
    BrowserModule,
    FormsModule
  ],
  declarations: [ 		// components
    AppComponent,
    ProductListComponent
  ],
  bootstrap: [ AppComponent ]	// root components
})
export class AppModule { }

Data Binding

Interpolation
<h1>{{ pageTitle }}</h1>
{{ 'Title: ' + pageTitle }}
{{ 2 * 20 + 1 }}
{{ 'Title: ' + getTitle() }}
<h1 innerText={{ pageTitle }}></h1>
<img src={{ imageUrl }}>
<img src={{ 'http://' + imageUrl  }}
export class AppcComponent = {
  pageTitile: string = "Hello Wrold",
  getTitle: function(){
    return this.pageTitle
  }
}
Property Binding
<img [src]='product.imageUrl'
     [style.width.px]='imageWidth'>
[src] is the binding target
’product.imageUrl’ is the binding source
Event Binding
the only binding from DOM to COMPONENT
<button (click)='toggleImage()'></button>
(click) is the target event
’toggleImage()’ is the template statement
Two-way Binding
<input [(ngModel)]='listFilter' />
[()] indicate the truth that two-way binding is the combination of property binding and event binding
ngModel is from FormModule, so we need import FormModule into appModule firstly
Pipes
pipes transform bound properties before display
following are some built-in pipes:
date
number, decimal, percent, currency
json, slice
{{ price | currency | lowercase }}
{{ price | currency:'USD':true:'1.2-2' }}
custom pipes
// product-filter.pipe.ts

import { PipeTransform, Pipe } from "@angular/core";
import { IProduct } from './product'

@Pipe({
    name: 'productFilter',			// pipe name that used in HTML
})

export class ProductFilterPipe implements PipeTransform {
    transform(value: IProduct[], filterBy: string): IProduct[] {
        filterBy = filterBy ? filterBy.toLocaleLowerCase() : null;
        return filterBy ? value.filter((product: IProduct[]) =>
            product.productName.toLocaleLowerCase().indexOf(filterBy) !== -1) : value;
    }
}
- create a new ts file for each custom pipe
- import PipeTransform and Pipe module from angualr core
- create a Pipe decorator
- implement PipeTransform with transform function
Built-in Directives
Structural Directives
from the Browser Module
*ngIf: If logic
<h1 *ngIf='products && products.length'></h1>*ngFor: Loop logic
<tr *ngFor="let product of products">
  <td></td>
  <td>{{ product.productName }}</td>
  <td>{{ product.productCode }}</td>
  <td>{{ product.releaseDate }}</td>
  <td>{{ product. price}}</td>
  <td>{{ product. starRating}}</td>
</tr>
for… of VS for… in
- for… of… : iterates over iterable objects, such as array, return true array element
- for… in…: interates over properities of an object, return index of array element
Service & DI
Service: A class with a focused purpose, which used for features:
- are independent from any particular components
- provide shard data or logic cross components
- Encapsulate external interactions
How to build a Service (similar to build a component)
- Step1: create the service class
- Step2: defind metadata with a decorator named @Injectable()
- Step3: import what we need, like Injectable from ‘@Angular/core’
import { Injectable } from '@angular/core'

@Injectable()

export class ProductService {
    getProduct(): IProduct[] {
        return ...;
    }
}
How to register a Service
if service been registered into a component, then this component and its children can use this service
if service been registered into the Angular root component, then this service can be used everywhere
import { Component } from '@angular/core';
import {ProductService} from "./products/product.service";

@Component({
  ...
    providers: [ProductService]  // registeration
})
How to use Service in a component (Dependency Injection)
implement DI in the constructor of class. (constructor only used fot init the instance)
import { Component } from '@angular/core';
import { ProductService } from "./products/product.service";

@Component({...})

export class ProductListComponent implements OnInits{

    // private _productService;
    // constructor (productService: ProductService) {
    //	   _productService = productService
    // }
    //
	// 			EQUALS TO

    constructor (private _productService: ProductService) {
    }

    ngOnInit(): void {
       this.product = this._productService.getProduct();
    }
}
we call _productService in OnInit since constructor should only be used to init the class
HTTP Request
Step1: import a ‘HttpModule’ module from ‘@Angular/http’ into Angular APP Module
Step2: use http module to send request in certain component / service
// in product.service.ts

...

import {Http, Response} from "@angular/http";
import {Observable} from "rxjs";
import 'rxjs/add/operator/map'

@Injectable()

export class ProductService {
    private _productUrl = 'www.baidu.com/product';

    constructor (private  _http: Http) { }

    getProducts(): Observable<IProduct[]> {
        var response = this._http.get(this._productUrl);
      	return response.map((response: Response) => <IProduct[]>response.json());
    }
}
Routing
Declear in root module
...
import { RouterModule } from '@angular/router';

@NgModule({
  imports: [
    ...,
    RouterModule.forRoot([routeConfig], {useHash: true})
  ]
})
Configure Route
const routeConfig = [
  { path: 'products', component: ProductListComponent },
  { path: 'products/:id', component: ProductDetailComponent },
  { path: '', component: HomeComponent },
  { path: '**', component: PageNotFoundComponent },
]
Route Configuration can also be placed inside of component’s
name.routes.tsUse It!
<router-outlet></router-outlet>					/* where the linked content show up */
<a routerLink="/products">Product List</a>
{ path: 'products', component: ProductionListComponent }

// product-list.component.ts
import { Component } from '@angular/core';
@Component({
  templateUrl: '....html'
})
export class ProductListComponent { }
Protect Routes with Guards
- CanActive: Guard navigation to a route
- CanDeactive: Guard navigation from a route
- Resolve: Pre-fetch data before activating a route
- CanLoad: Prevent asynchronous routing